
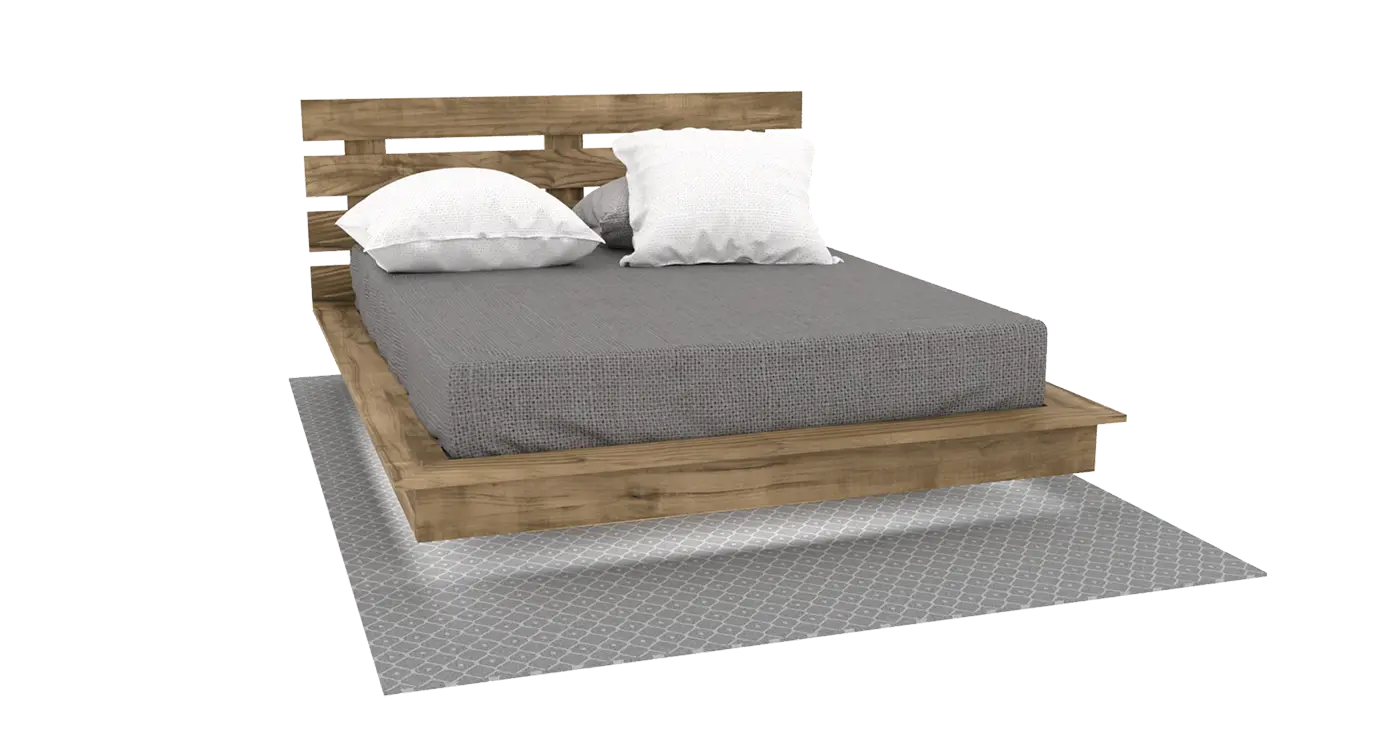
Looking to transform your bedroom with a sleek, modern touch? Building a DIY floating bed is the ultimate weekend woodworking project that adds a premium, high-end look without the designer price tag. This step-by-step guide will walk you through the entire building process, helping you create a stunning levitating platform bed complete with ambient LED underglow and a secure, heavy-duty wall-mounted headboard.
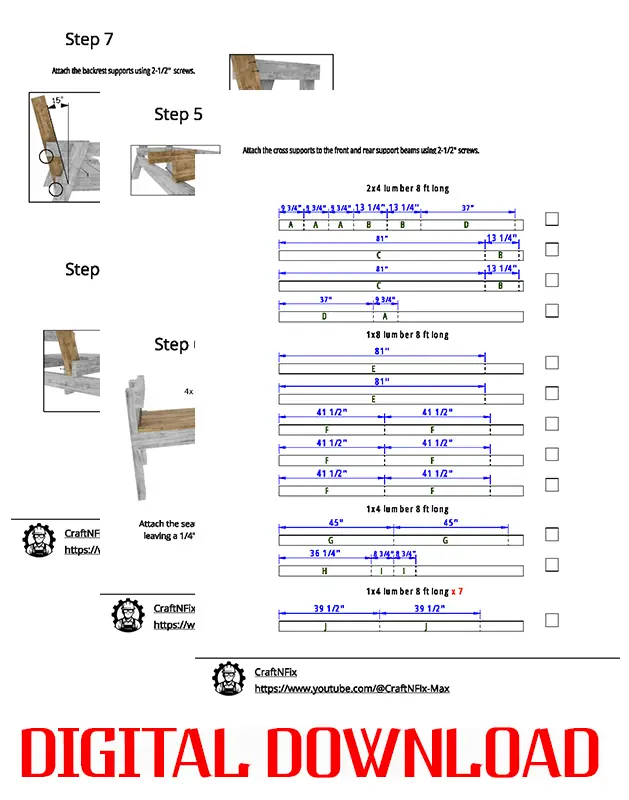
DIY Floating Bed Frame PDF Plans
⭐⭐⭐⭐⭐ 4.9/5 (based on 140+ buyers)
What’s Included:
✓ Step-by-Step PDF Guide: Clear blueprints with dual dimensions (Inches & MM).
✓ Smart Cut Lists: Optimized layout to buy exactly what you need with zero wood waste.
✓ 2 SketchUp 3D Models: Fully interactive files to view the bed from any angle.
✓ Complete Materials & Tools List: Shopping checklist to save you trips to Home Depot.
✓ Instant Digital Download: Get your files via email immediately after checkout.



To make this build as accessible as possible, our tutorial features dual measurements in both inches and millimeters, making it perfect for builders using standard US lumber sizes or European materials. Whether you are an experienced woodworker or a motivated DIY beginner, these clear blueprints, pro tips for squeak-free joints, and precise dimensions ensure a flawless assembly from start to finish.
Watch the Step-by-Step Video Tutorial

Tools and Materials Checklist (Shopping List)
| Dimensions (inch) | Dimensions (mm) | Quantity |
|---|---|---|
| 2×6 lumber 8 ft long | 45x140x2500 | 9 pcs |
| 2×4 lumber 8 ft long | 38x89x2500 | 7 pcs (8 pcs for Metric size) |
| 1×6 lumber 8 ft long | 19x140x2500 | 23 pcs |
| Heavy-Duty Wood Glue | Heavy-Duty Wood Glue | 1 bottle |
| Lag Bolts 3/8”x4” | Lag Bolts 10x100mm | 2 pcs |
| 1 1/4″ screws | 30 mm screws | 24 pcs (139 pcs for Metric size) |
| 1 1/2″ screws | – | 115 pcs |
| 2 1/2″ screws | 70mm screws | 120 pcs |
| LED light strip (229″ min. length) with adhesive backing & power adapter | LED light strip (229″ min. length) with adhesive backing & power adapter | 1 pc |
Cut List
Save Time & Material: Full Cut List Inside the PDF Plans!
Support my work for the price of a coffee and get the full, ad-free plans!
Step 1: Assembling the Bed Base Frame
Note: Apply wood glue to all joints before fastening to prevent future squeaking.
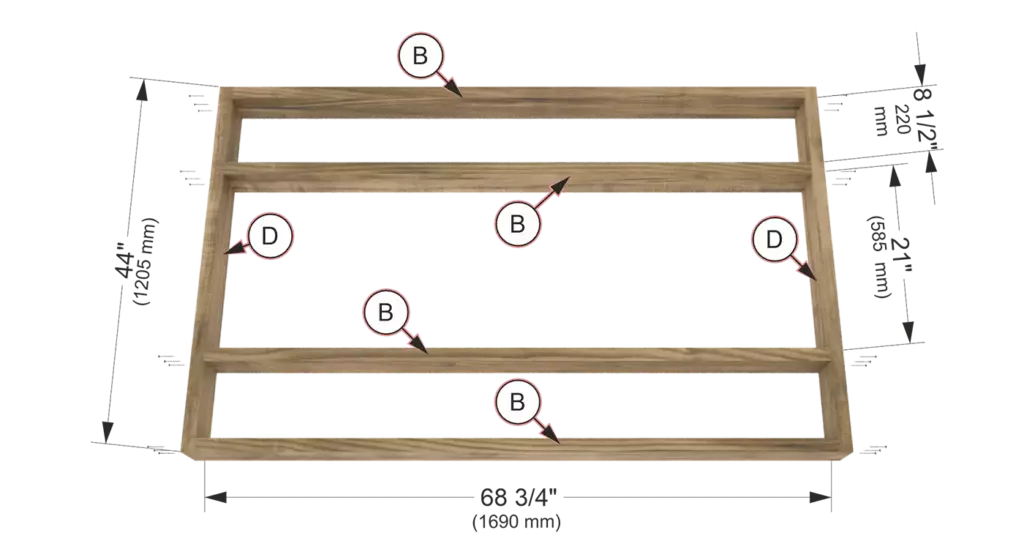
Assemble the inner support frame using 2×6 (45×140 mm) boards. Lay out the pieces (B and D) according to the diagram: total width 68 3/4″ (1690 mm) and depth 44″ (1205 mm). Fasten all joints tightly using 2 1/2″ (70 mm) screws, making sure all corners are perfectly square.
Step 2: Assembling the Main Bed Frame
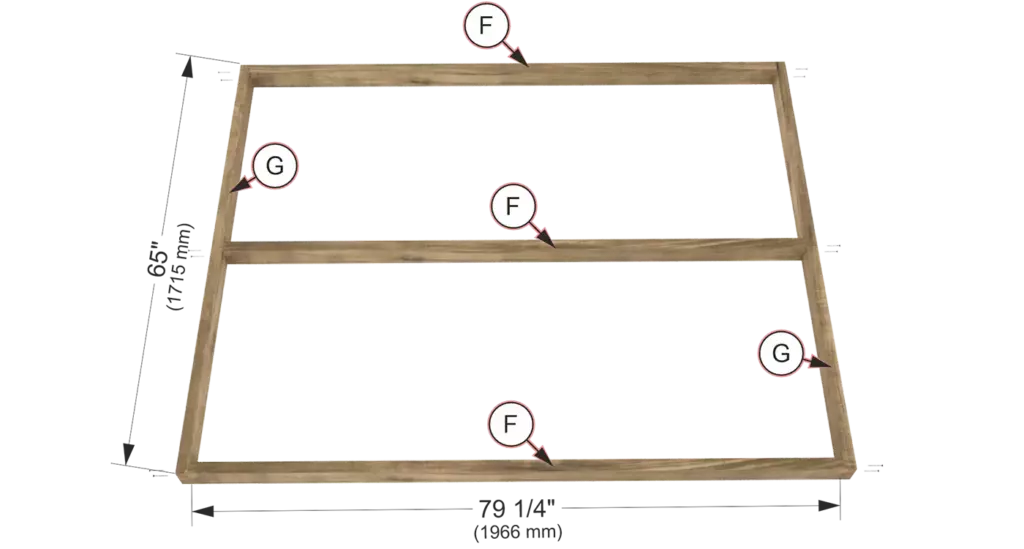
Construct the main bed frame using 2×4 (39×89 mm) boards. Arrange the pieces (F and G) as shown in the diagram: total width 79 1/4″ (1966 mm) and depth 65″ (1715 mm). Fasten the corners and the center support tightly using 2 1/2″ (70 mm) screws, ensuring the frame is square.
Step 3: Reinforcing the Frame
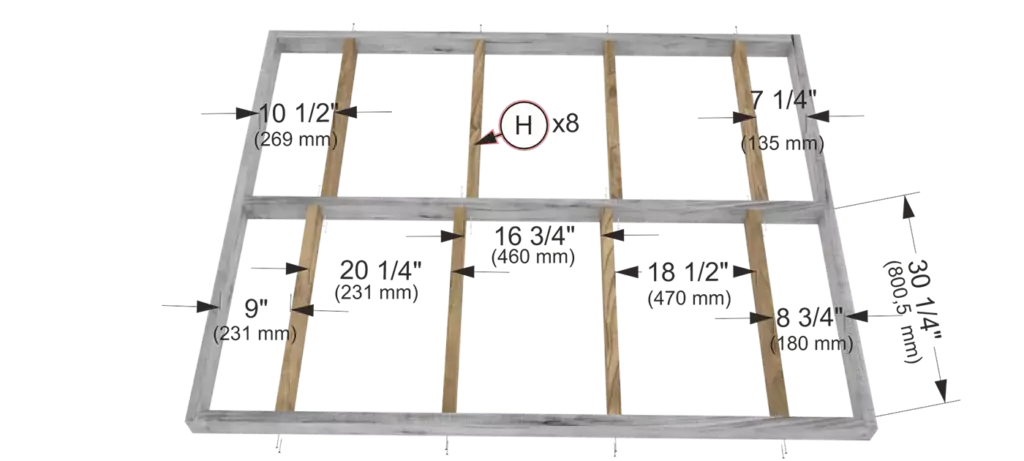
Reinforce the main frame by installing the 8 inner support boards (H) made from 2×4 (39×89 mm) lumber. Space them out precisely according to the measurements in the diagram. Secure each support tightly using 2 1/2″ (70 mm) wood screws to ensure maximum weight capacity.
Step 4: Attaching the Outer Frame Trim
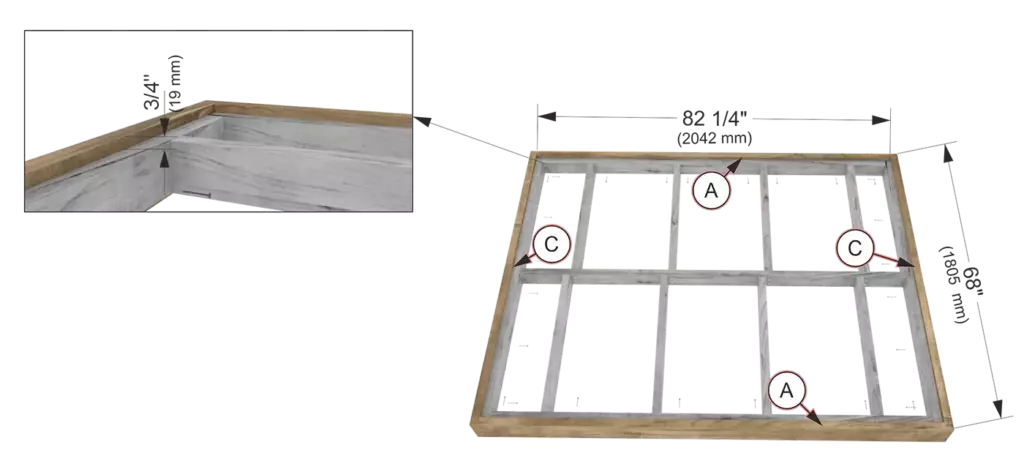
Install the outer decorative trim using 2×6 (45×140 mm) boards (A and C) around the perimeter. To keep the exterior face completely clean and free of visible screw heads, drive the 2 1/2″ (70 mm) screws from the inside of the inner frame directly into the trim boards.
Step 5: Installing the Base Mounting Supports
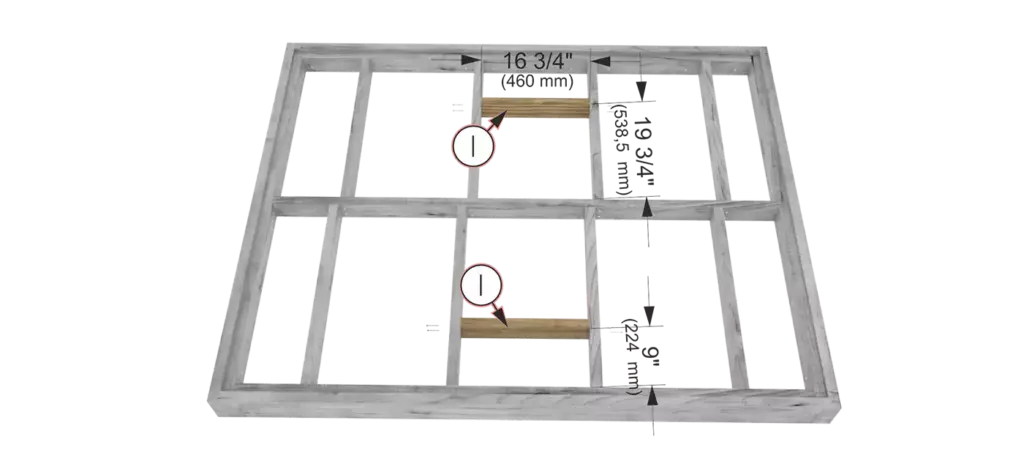
Attach the two inner 2×4 (38×89 mm) support boards (I) to the main frame using 2 1/2″ (70 mm) screws. These blocks act as the mounting points to connect the main frame to the lower base. Position them precisely so they rest directly on top of the base frame edges during final assembly.
Step 6: Joining the Main Frame and Base
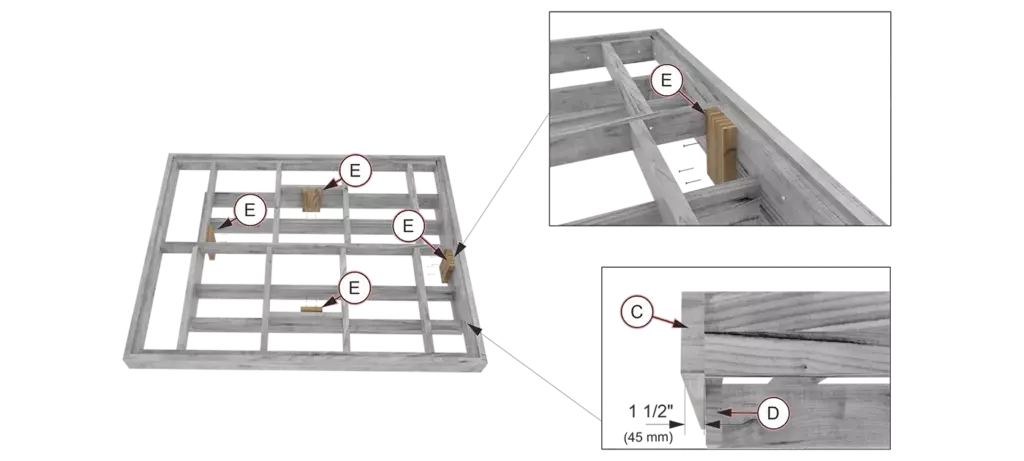
Lock the main bed frame and the lower base together using the mounting blocks (E). Position these blocks firmly at the designated connection points as illustrated in the diagram. Secure everything tightly from the inside using 2 1/2″ (70 mm) wood screws to create a solid, unmoving structure.
Step 7: Installing the Mattress Slats
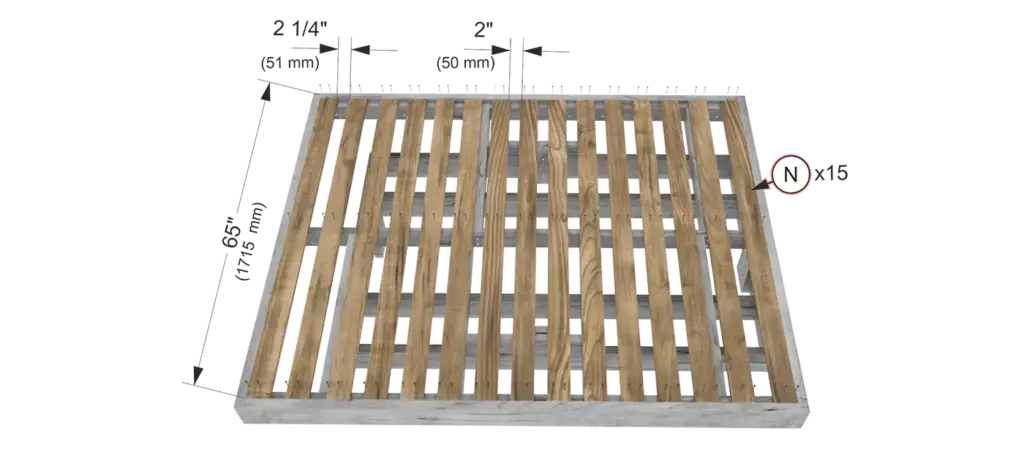
Lay down 15 mattress slats (N) using 1×4 (19×89 mm) boards. Evenly space the slats across the frame, keeping the gaps between 2″ and 3″ (50–65 mm). For a perfect fit as shown in the diagram, set the spacing to 2 1/4″ (51 mm) on the first half and 2″ (50 mm) on the second half. Secure each slat using 1 1/2″ (38 mm / 30 mm) wood screws.
Step 8: Applying Glue for the Bed Trim
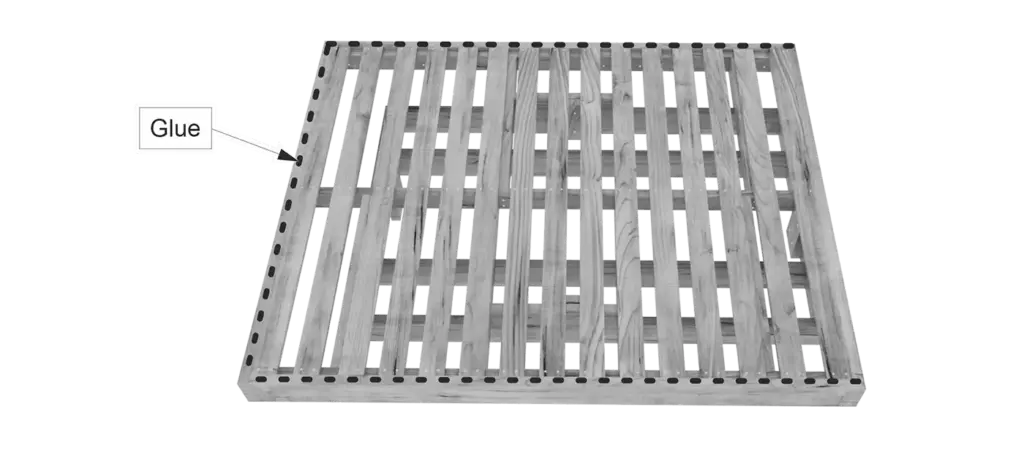
Apply a generous, continuous bead of high-quality wood glue along the entire top perimeter of the bed frame as indicated by the dotted lines in the diagram. This adhesive layer is absolutely required to securely hold and lock the final decorative bed trim (bed lip/threshold) in place.
Step 9: Installing the Top Cap Trim
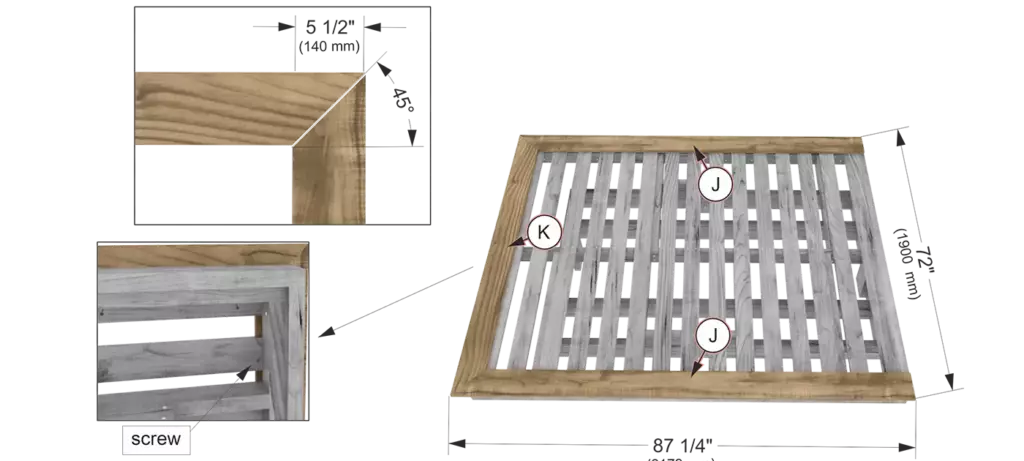
Pro Tip: If cutting 45-degree miter joints feels too difficult, you can easily connect the boards using simple, straight butt joints at 90 degrees instead.
Install the top threshold cap along the glued perimeter using 1×6 (19×140 mm) boards (J and K). To keep the top surface completely smooth and free of visible screws, secure the boards from the inside. Drive 1 1/2″ (38 mm / 30 mm) screws at an angle through the slats directly into the bottom of the trim boards.
Step 10: Installing the Headboard Supports
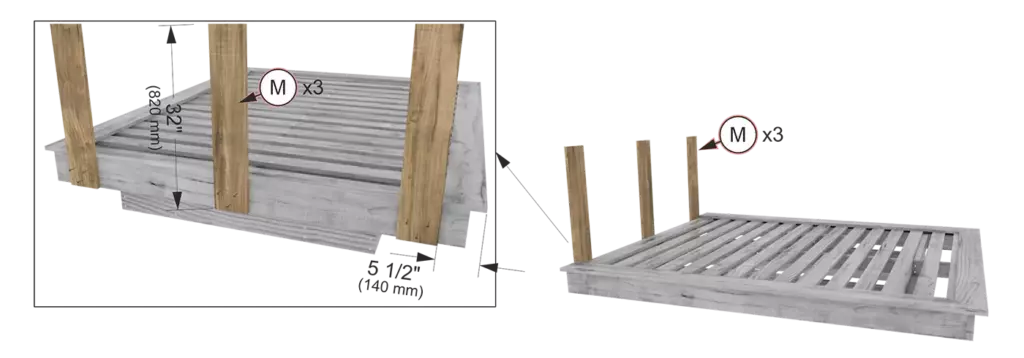
Attach the vertical headboard support base using three 1×6 (19×140 mm) boards (M). Position them at the back of the bed frame according to the diagram measurements: a total height of 32″ (820 mm). Secure each board tightly to the main frame from the inside or back using 1 1/2″ (38 mm / 30 mm) screws and wood glue.
Step 11: Attaching the Headboard Slats
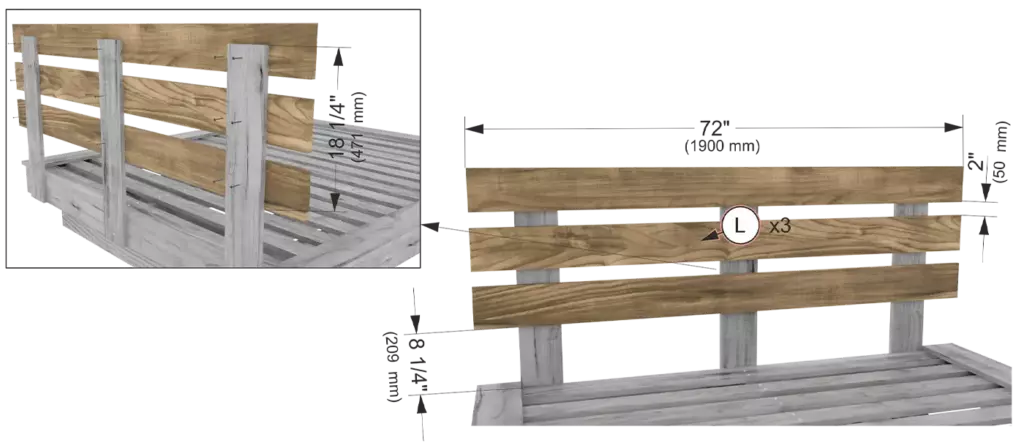
Install the three horizontal 1×6 (19×140 mm) headboard slats (L) onto the vertical supports. Position the bottom slat 8 1/4″ (209 mm) above the bed frame. To hide the screw heads completely, secure the slats from the inside/back of the support posts using 1 1/4″ (32 mm / 30 mm) wood screws.
Step 12: Securing the Bed to the Wall
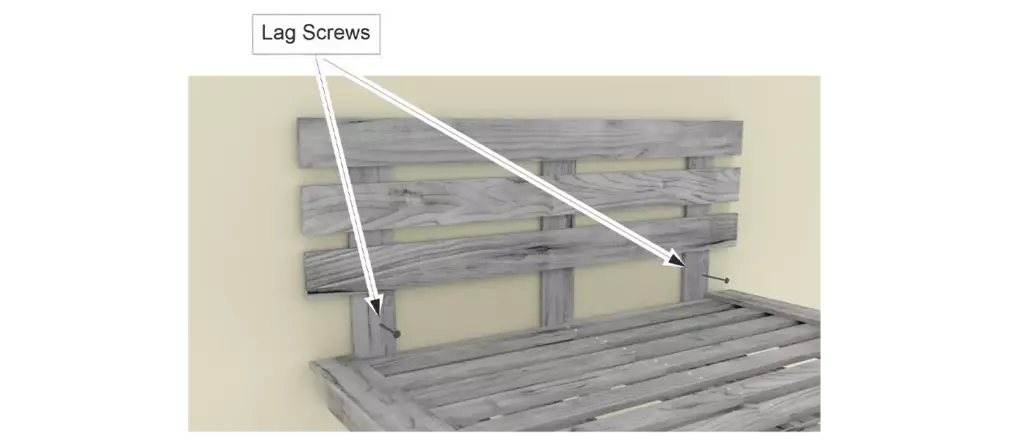
To prevent the bed from tipping or shifting during sudden movements, anchor the headboard frame to the wall. Align the vertical support posts with your wall studs. Secure the structure firmly using heavy-duty 3/8″ x 4″ (10×100 mm) Hex Head Lag Screws (Lag Bolts) with washers. Pre-drill pilot holes first to avoid splitting the wood.
Step 13: Attaching the Final Headboard Slat
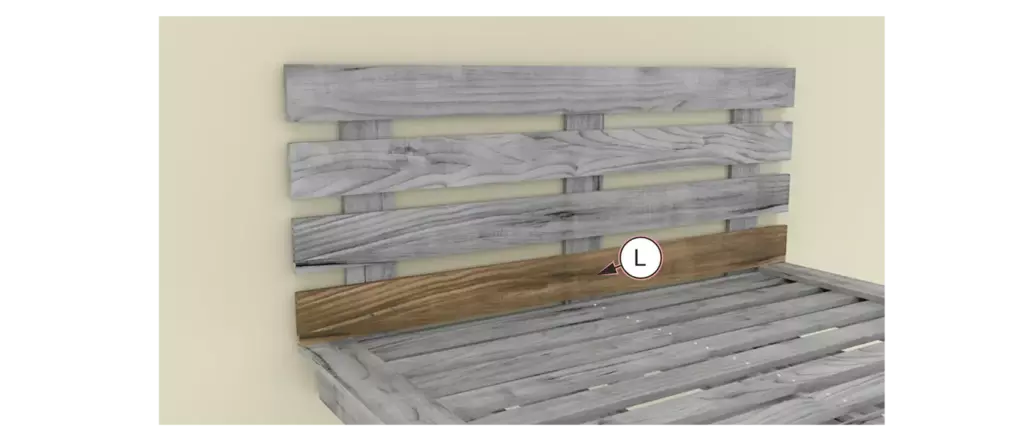
Install the fourth and final horizontal 1×6 (19×140 mm) headboard slat (L) at the bottom of the structure. Since this piece will sit behind your mattress, you can drive the 1 1/4″ (30 mm) wood screws directly from the front/exterior side into the vertical supports for a quick and secure installation.
Step 14: Installing the LED Underglow Lights
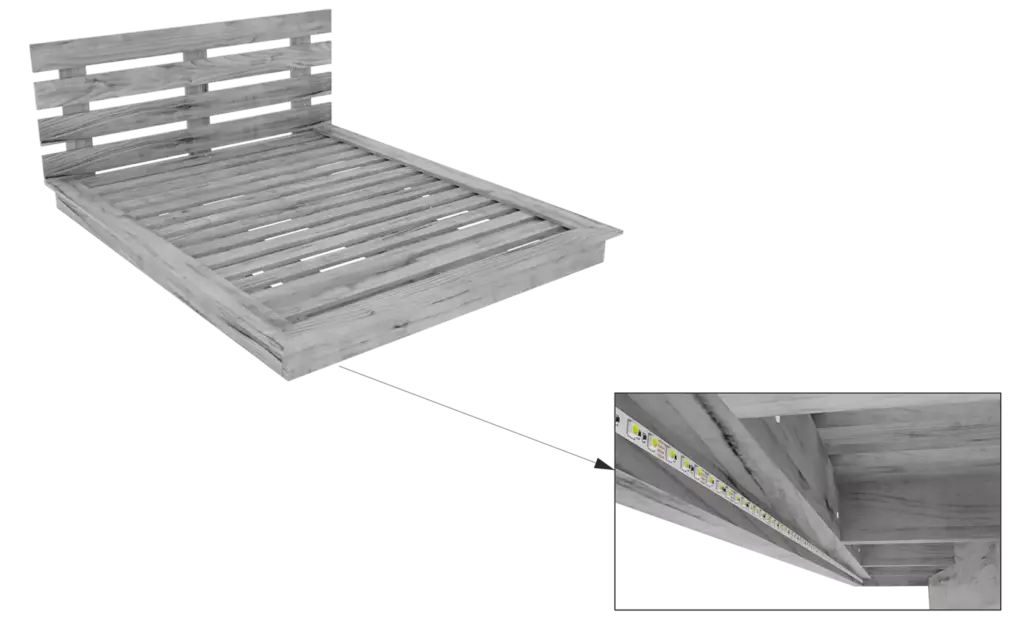
To maximize the floating effect, install an LED light strip along the inner perimeter of the main frame. You will need a strip length of 229″ (5.75 m) to wrap fully around the underside. Mount the strip facing downward or inward to create a seamless, glowing ambiance that completely hides the bed base from view.
Finishing Touches: Staining and Styling Your Floating Bed
- Pro Tip: To protect the wood and highlight its natural grain, we highly recommend applying a high-quality wood stain followed by a protective clear coat of polyurethane lacquer or varnish.
Congratulations! Your modern DIY floating bed frame is fully assembled, secure, and ready for use. Now, all that’s left to do is add your favorite mattress, throw on some comfortable pillows, and style your bedding. Turn on the LED underglow lights at night to fully enjoy the stunning, premium levitation effect you built with your own hands!