
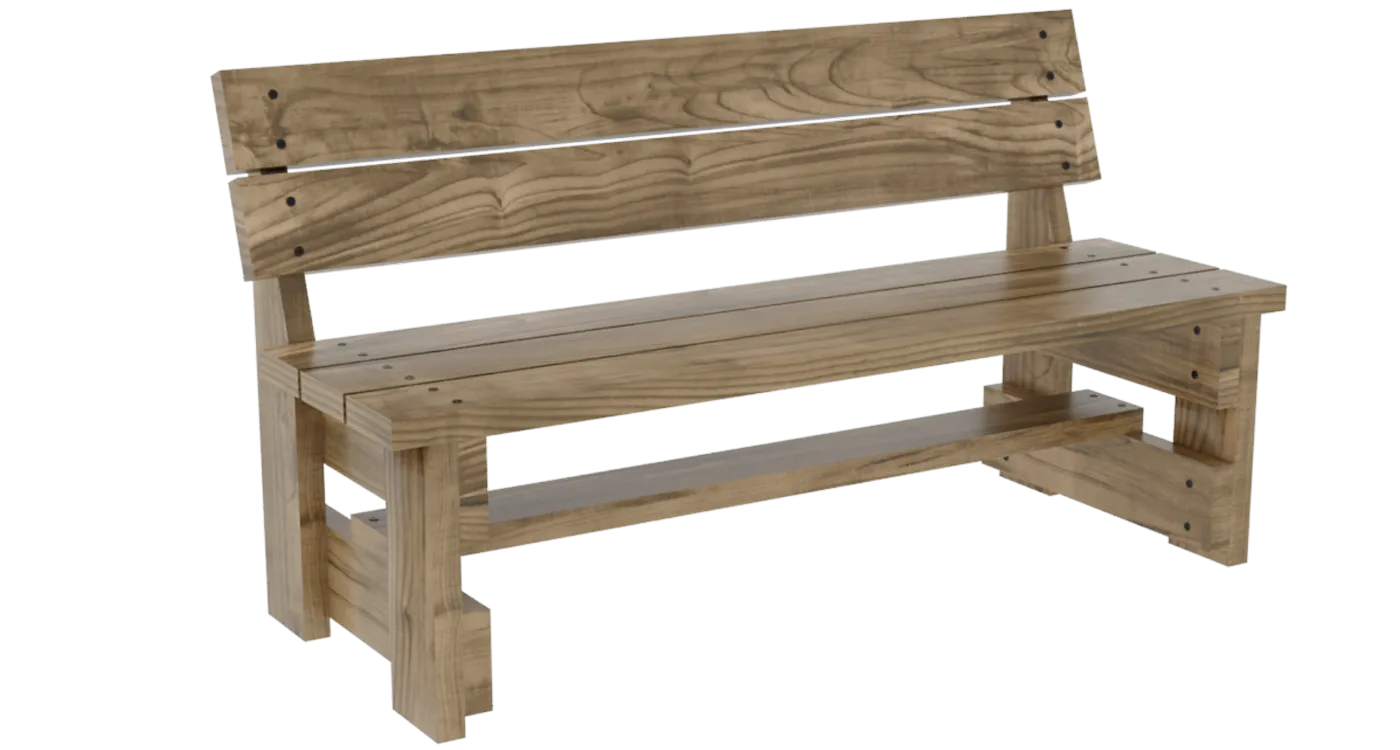
Looking for a quick, budget-friendly project to upgrade your backyard, patio, or garden? These easy DIY bench plans are designed to help you build a sturdy and comfortable wooden bench with a backrest. It’s the perfect weekend project for beginners and experienced woodworkers alike who want high-quality results with minimal tools and effort. Whether you want to add functional backyard seating or create a cozy spot on your porch, this blueprint makes the entire building process straightforward and stress-free.
Enjoying these free plans?
If you’d like to support my work, you can get my PDF plan library with drawings and building instructions. It’s a convenient way to keep everything in one place while you build.
Learn more about supporting CraftNFix →
In this step-by-step woodworking guide, we provide clear, easy-to-follow diagrams with dual dimensions in both inches and metric measurements (mm). We will walk you through the entire assembly process—from cutting the precise angles for the angled backrest to the final protective finish.
Watch the 3D Assembly Animation Video

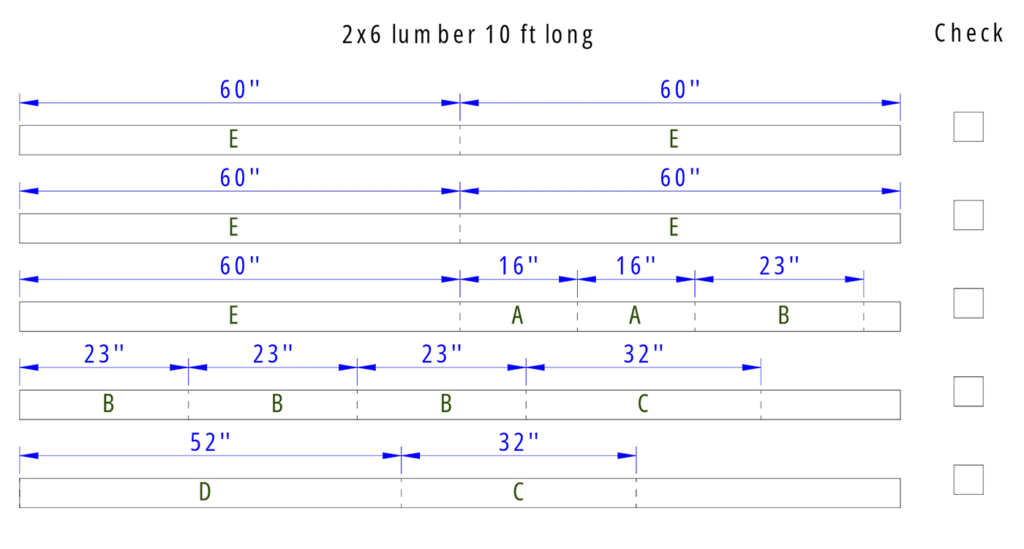
Materials List (inch)
| Dimensions (inch) | Quantity |
|---|---|
| 2×6 lumber 10 ft long | 5 |
| 2 1/2″ screws | 40 |
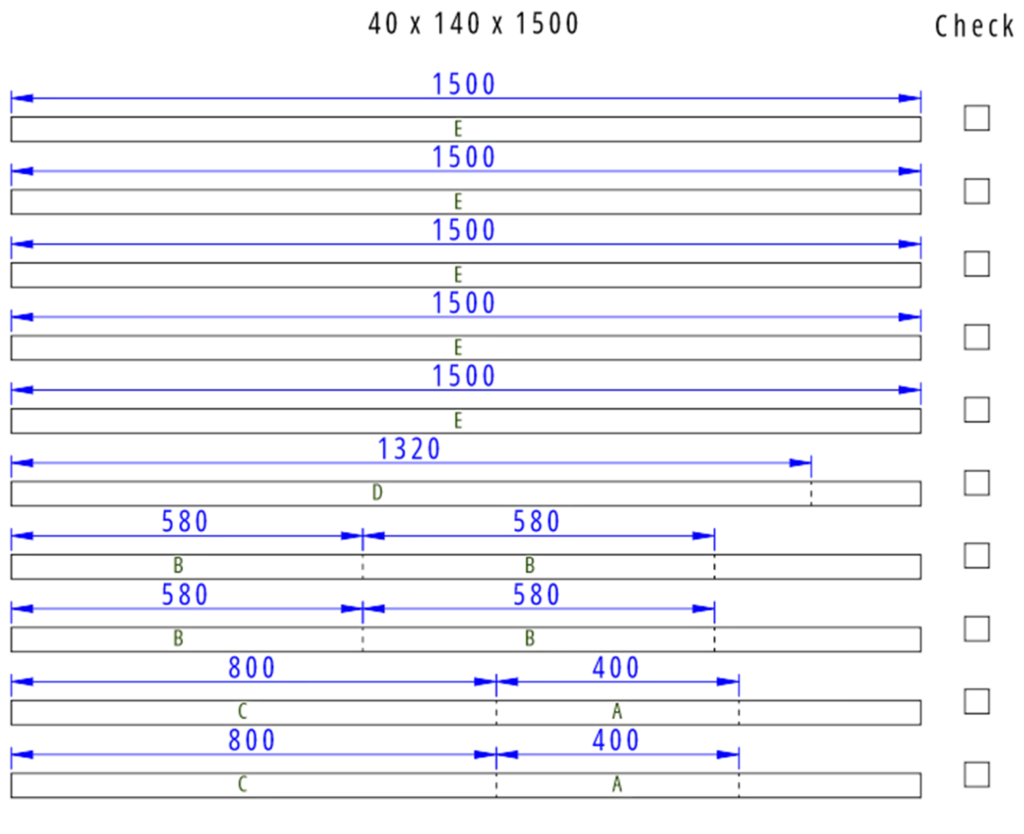
Materials List (mm)
| Dimensions (mm) | Quantity |
|---|---|
| 40 x 140 x 1500 | 10 |
| 60mm screws | 40 |
Note for European builders: Since 10 ft lumber can be difficult to find in Europe, the metric material list is optimized for standard 1.5-meter (1500 mm) boards.
Cut List
| Part ID | Quantity | Dimensions (inch) | Dimensions (mm) | Notes |
|---|---|---|---|---|
| A | 2 | 2″ x 6″ x 16″ | 40 x 140 x 400 | Front Legs |
| B | 4 | 2″ x 6″ x 23″ | 40 x 140 x 580 | Support |
| C | 2 | 2″ x 6″ x32″ | 40 x 140 x 800 | Rear Legs |
| D | 1 | 2″ x 6″ x 52″ | 40 x 140 x 1320 | Cross Supports |
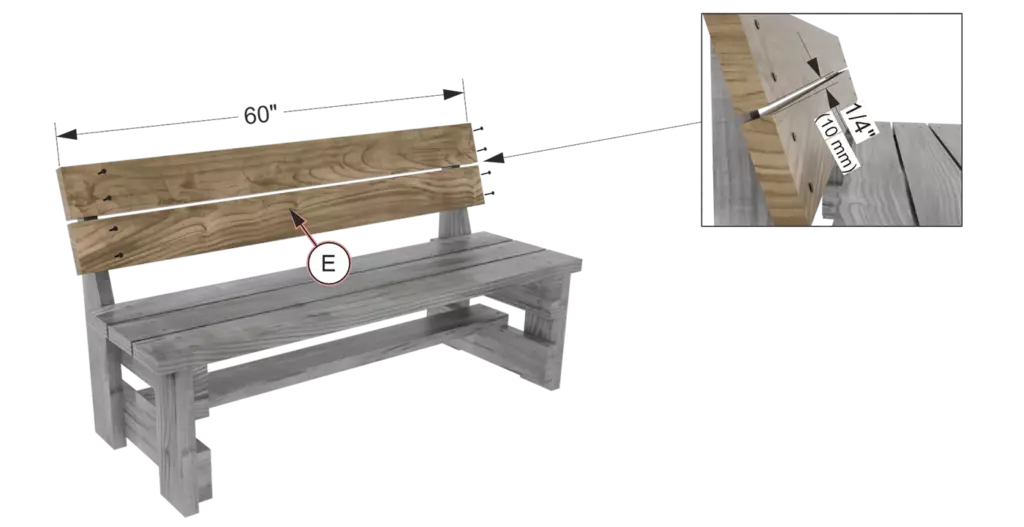
| E | 5 | 2″ x 6″ x 60″ | 40 x 140 x 1500 | Seat |
Step 1
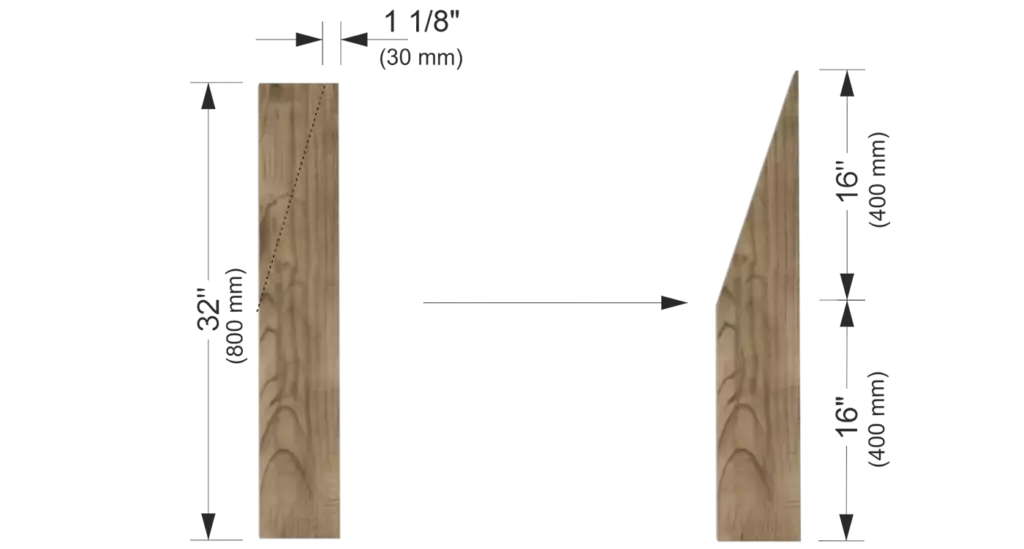
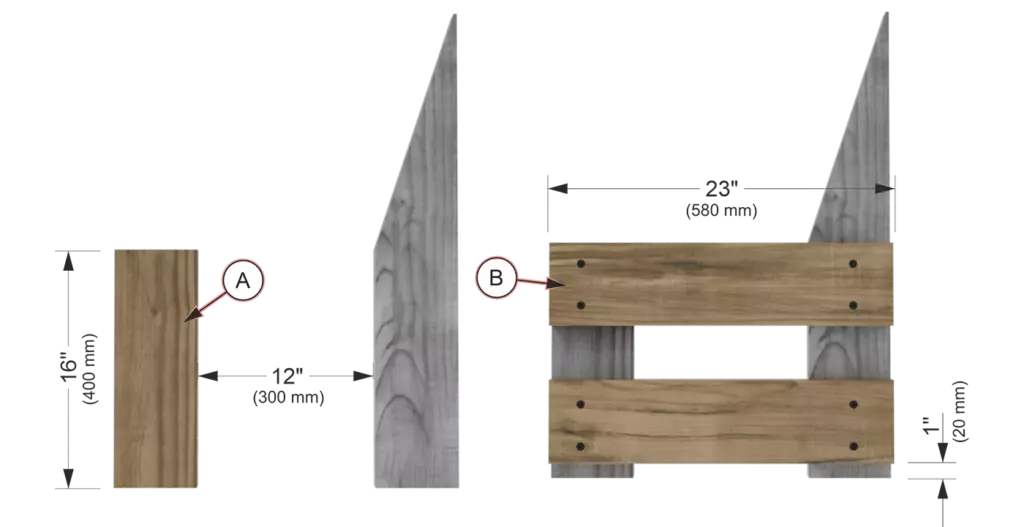
Preparing Board C for the Backrest Slope: Take Board C and mark its midpoint at 16″ (400 mm) from the bottom. From the top edge, measure 1 1/8″ (30 mm) inward. Draw a straight line between these two marks to establish the 75-degree taper angle for the backrest. Cut along this line to shape the support as shown in the diagram.
Step 2
Pre-drill holes and secure two horizontal supports (B) to legs A and C spaced 12″ (300 mm) apart, using 2 1/2″ (60 mm) wood screws, keeping a 1″ (20 mm) gap at the bottom.
Step 3
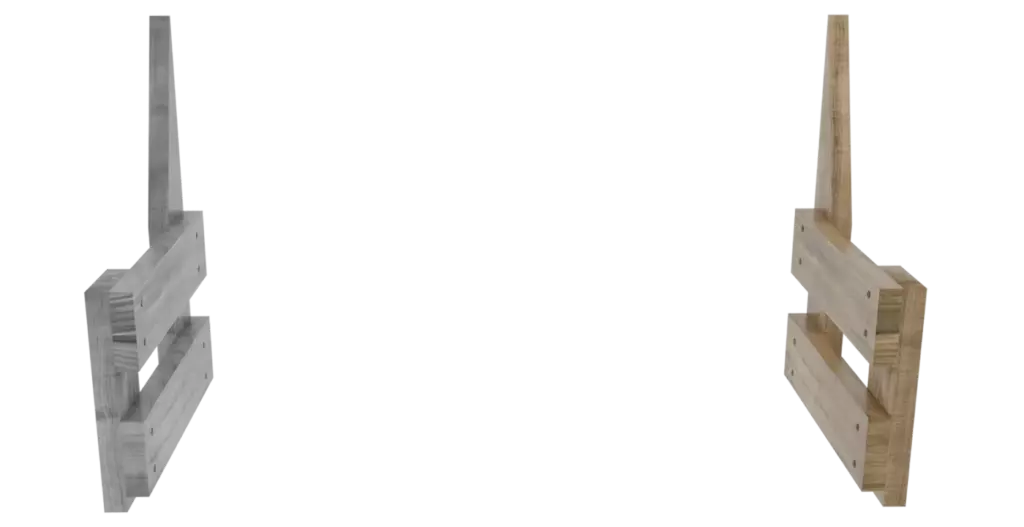
Repeat the process to assemble the second side frame, ensuring it is a mirrored copy of the first one.
Step 4
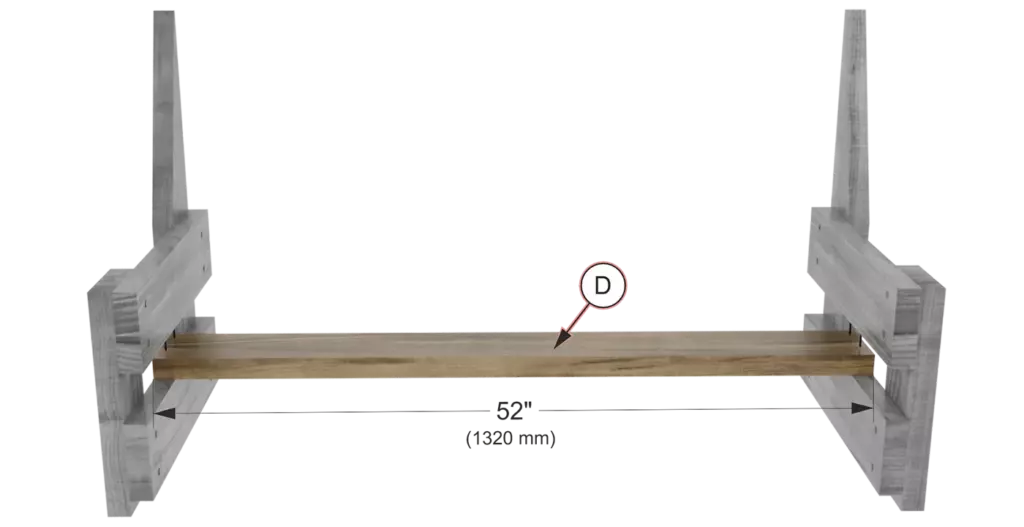
Pre-drill holes and connect the two side frames using support board D (52″ / 1320 mm), securing it with 2 1/2″ (60 mm) wood screws.
Step 5
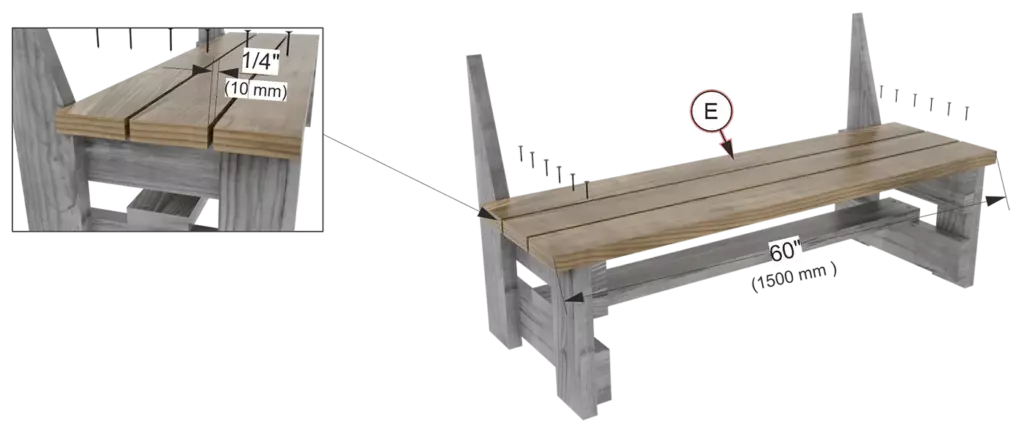
Pre-drill holes and attach seat boards E (60″ / 1500 mm) using 2 1/2″ (60 mm) wood screws, leaving a 1/4″ (10 mm) gap between the boards.
Step 6
Pre-drill holes and attach backrest boards E (60″ / 1500 mm) using 2 1/2″ (60 mm) wood screws, leaving a 1/4″ (10 mm) gap between them.
Step 7
Your bench is complete! Apply a protective wood finish or sealer to enhance durability and protect it from the elements.
Congratulations on building your new outdoor furniture piece! Taking the time to build a simple wooden bench yourself not only saves money but also gives you a durable, customized product you can be proud of. Now that the assembly is complete, you can customize your project further by applying a vibrant outdoor paint or a rich wood stain to match your backyard decor. Don’t forget to subscribe to our channel, share your finished project in the comments, and check out our other free DIY woodworking plans to keep upgrading your home and garden!