
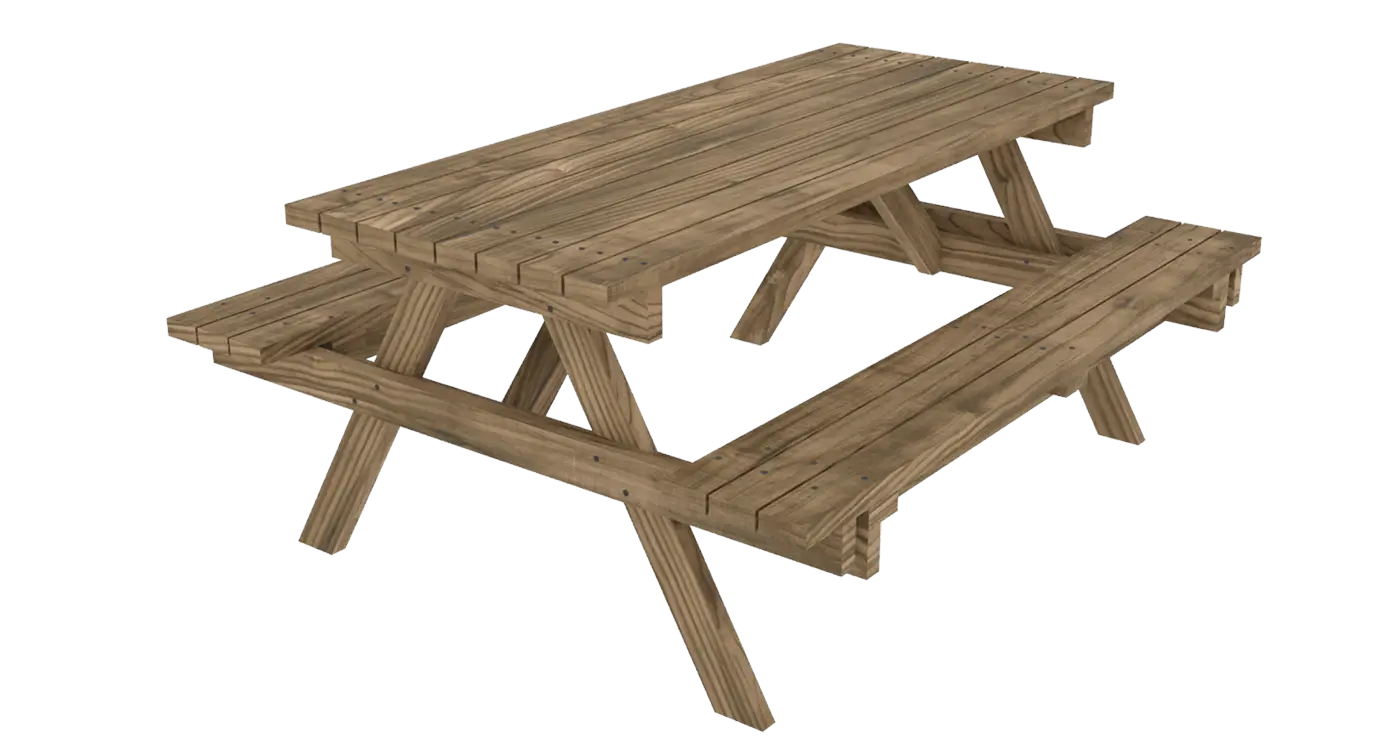
Building your own outdoor furniture is one of the most rewarding weekend projects you can take on. A sturdy, classic picnic table is the ultimate centerpiece for backyard BBQs, family gatherings, and summer dinners. In this comprehensive guide, we will show you how to build a durable 6-foot DIY picnic table using standard, budget-friendly 2×4 lumber. Whether you are a seasoned woodworker or a complete beginner, this project is designed to be straightforward, fun, and highly rewarding.
Enjoying these free plans?
If you’d like to support my work, you can get my PDF plan library with drawings and building instructions. It’s a convenient way to keep everything in one place while you build.
Learn more about supporting CraftNFix →
What makes this specific DIY 2×4 picnic table plan so unique is its smart structural design. Unlike cheap commercial alternatives that wobble and sag over time, our blueprint features integrated anti-sag center supports and a robust diagonal cross-bracing system. We have engineered the frame with rookie-friendly 30-degree angles so you can easily set your miter saw and get perfectly flush cuts without frustrating fractions. The result is a rock-solid, professional-grade picnic table with a 29 3/4″ tabletop and comfortable 11″ benches that will easily host your family for decades.
Watch the Step-by-Step Video Tutorial
Before you head out to the garage or backyard, watch our full video tutorial below. Seeing the cutting angles, the alignment of the legs, and the assembly of the tabletop in action will help you visualize the entire build process from start to finish.
Materials and Tools Needed for This Build
To make this project as affordable and efficient as possible, we created an optimized shopping list. You will need exactly 21 standard 8-foot 2×4 boards. Thanks to our clever cutting matrix, you will use almost 100% of the timber with practically zero waste, saving you money at the local home improvement store.
| Dimensions (inch) | Dimensions (mm) | Quantity |
|---|---|---|
| 2×4 lumber 8 ft long | 38x89x2400 | 21 |
| 2 1/2″ screws | 70mm screws | 118 |
Step-by-Step Picnic Table Construction Guide
Step 1: Cutting and Preparing the Mitered Table Legs
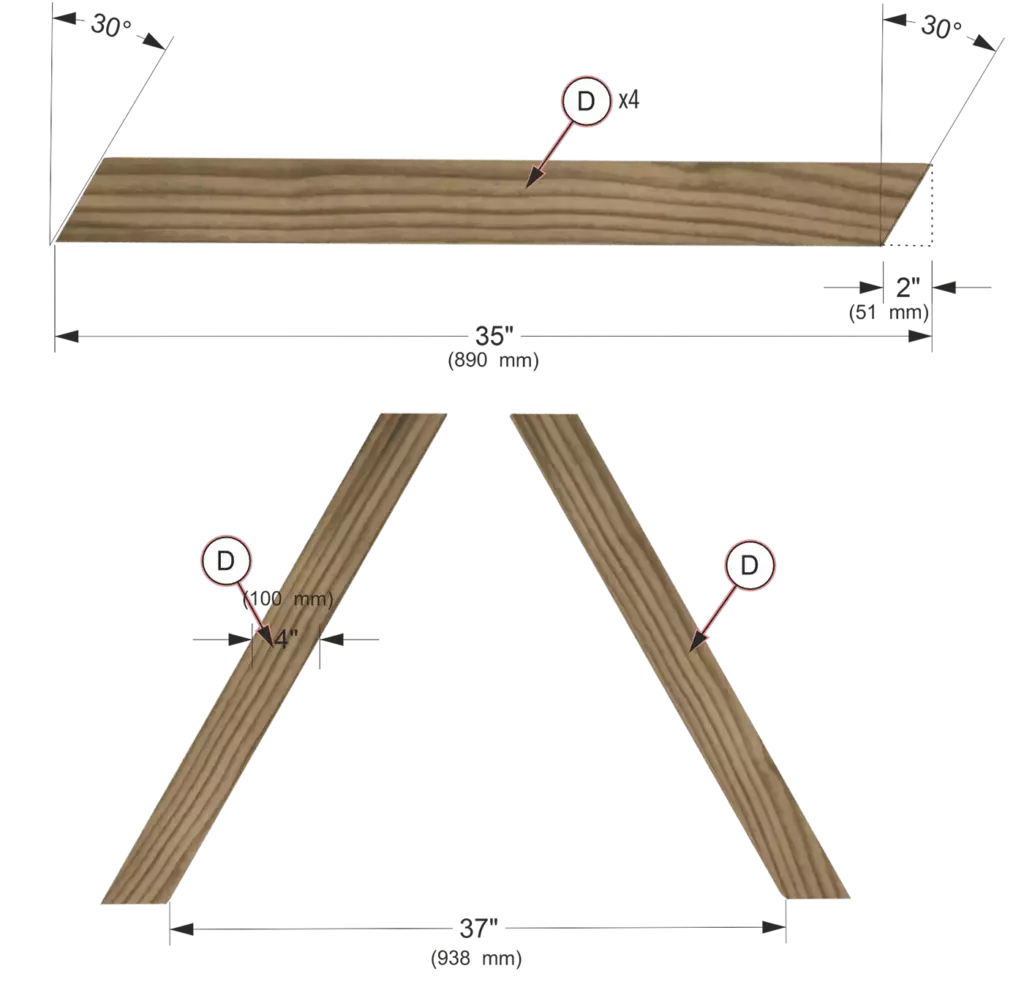
To begin the assembly, you need to prepare the foundation of your picnic table: the legs. Take four standard 2×4 boards and measure them out to a total length of 35″ (890 mm).
Using a miter saw, cut both ends of each board at a parallel 30-degree angle as shown in the diagram. This specific angle ensures the legs lean optimally to provide maximum stability. Double-check that you have prepared exactly 4 identical legs. Once cut, temporarily position them facing each other with an inner base spacing of 37″ (938 mm) to prepare for the frame assembly.
Step 2: Assembling the A-Frame Leg Supports
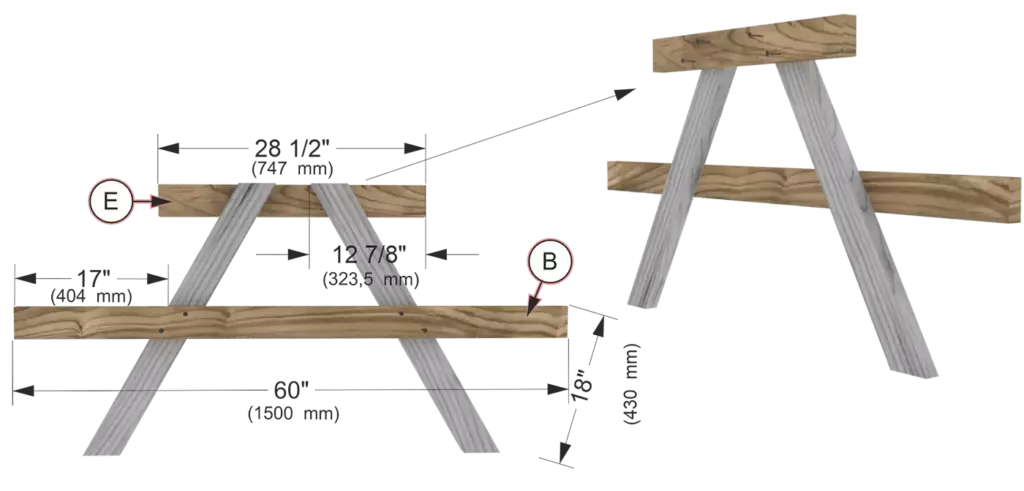
Now it is time to tie the legs together and build the main structural A-frames. You will need to construct two identical leg assemblies using upper supports and lower seat crossbeams.
Position the two mitered legs opposite each other. Attach the upper support board (28 1/2″ / 747 mm) flush with the top edges of the legs. Next, measure 18″ (430 mm) up from the bottom of the legs to position the main lower crossbeam board (60″ / 1500 mm). Ensure the crossbeam extends 17″ (404 mm) outward on both sides to serve as the sturdy foundation for the bench seats. Secure all joints firmly using 2-1/2″ (70 mm) wood screws.
Step 3: Installing the Tabletop and Bench Support Beams
With your A-frame supports built, it is time to assemble the main tabletop and install the long inner supports for the benches. This step brings the entire structure together.
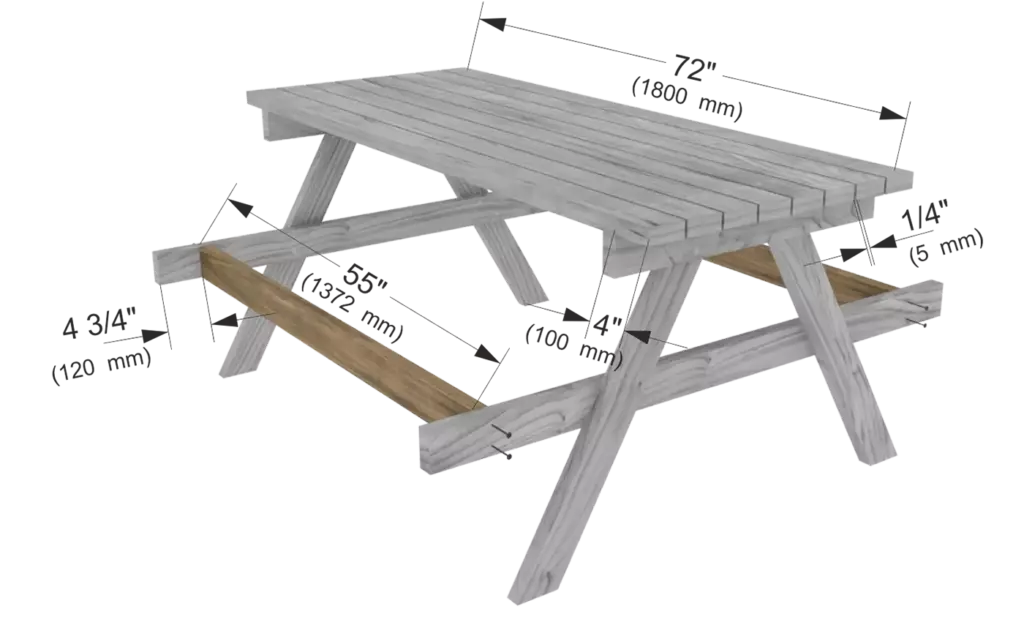
First, arrange the 8 tabletop boards, each measuring 72″ (1800 mm), across the top frame supports. Align them so they overhang the ends of the frame by 4″ (100 mm). Use 1/4″ (5 mm) spacers between the slats to maintain perfect drainage gaps, then secure each board to the frame using 2-1/2″ (70 mm) wood screws. Next, flip underneath to install the 2 inner bench support beams. Mount them flat between the lower crossbeams at a distance of 4 3/4″ (120 mm) from the inside edge, creating a solid 55″ (1372 mm) central free span that will keep your seats perfectly rigid.
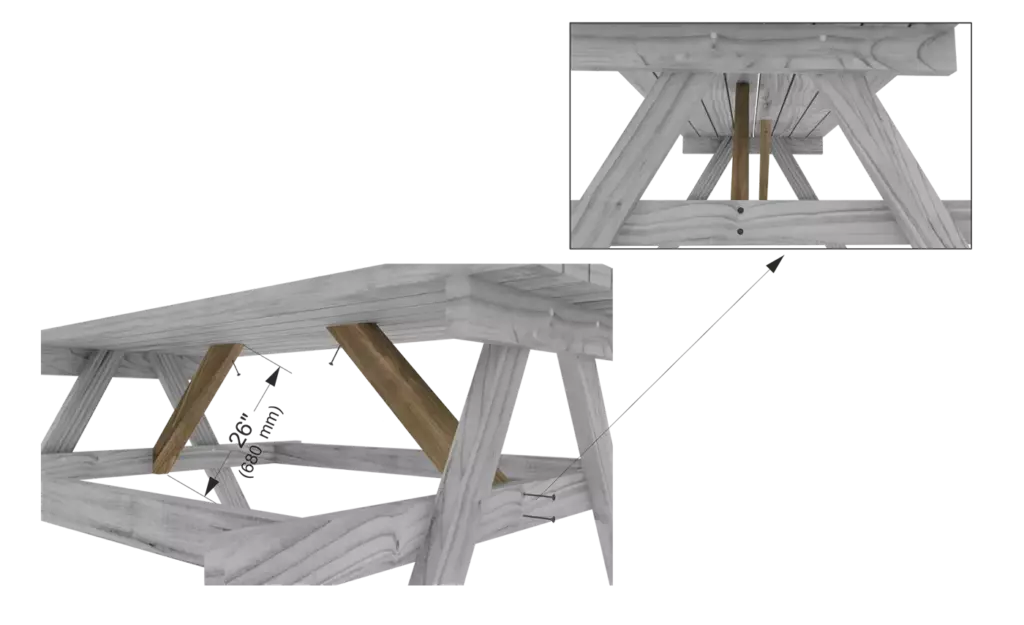
Step 4: Installing the Diagonal Cross-Braces for Maximum Stability
To prevent the table from wobbling or shifting side-to-side over time, you need to add diagonal bracing. This step locks the entire structural frame in place, making it rigid and secure.
Take two 26″ (680 mm) boards pre-cut at a 45-degree angle. Position them underneath the table, wedged tightly between the center slats of the tabletop and the lower crossbeams of the leg assemblies. Ensure they line up symmetrically as shown in the inset diagram. Secure the braces tightly using your 2-1/2″ (70 mm) deck screws, driving them directly into the framing and the tabletop boards to eliminate any remaining sway.
Step 5: Mounting the Bench Cross-Support Cleats
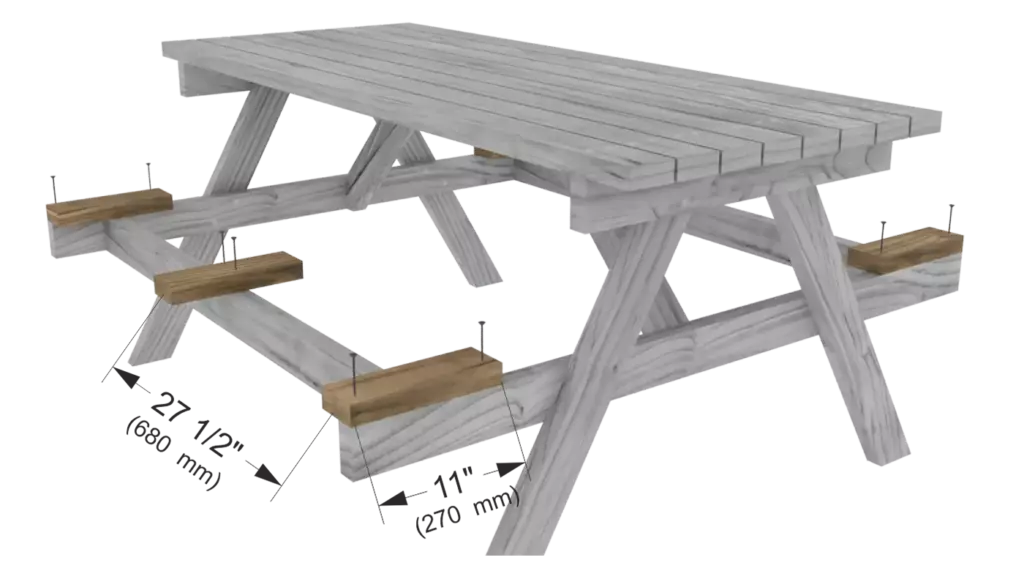
To eliminate any chance of the bench seats sagging under weight, we install short cross-support cleats. These blocks act as a bridge, anchoring the bench slats directly to the lower framing to ensure maximum rigidity.
Prepare six 11″ (270 mm) boards. Position three blocks on each side of the table frame as illustrated. Place the central support block strictly at the midpoint of the long span, measuring 27 1/2″ (680 mm) from the inside edge of the leg assembly crossbeam. Mount the remaining two blocks at the outer ends of the supports. Fasten each cleat securely from above into the lower frame using 2-1/2″ (70 mm) deck screws.
Step 6: Attaching the Final Bench Seat Boards
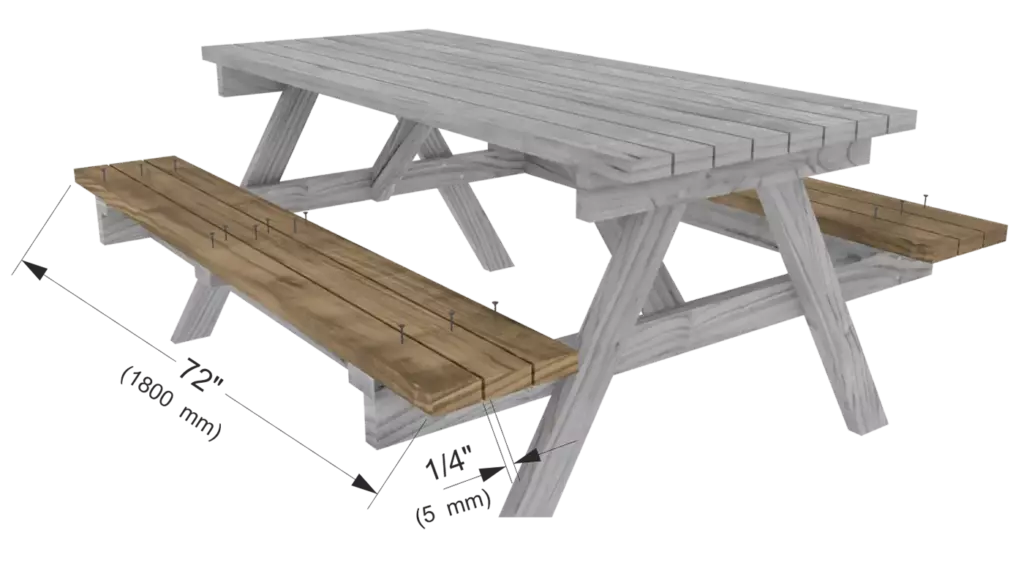
The final step in your DIY build is installing the bench slats. Just like the tabletop, the seats are designed to be comfortable, well-drained, and securely tied to the supporting frame underneath.
Take the remaining 6 boards, each measuring 72″ (1800 mm) long. Position 3 boards on each side of the table to form the bench seats. Align the slats so they sit flush with the outer support brackets. Use your 1/4″ (5 mm) spacers between the three boards to maintain a uniform gap for seasonal wood expansion and water drainage. Once perfectly aligned, drive 2-1/2″ (70 mm) wood screws straight down through the slats into the support frame and cross-cleats below. Your classic 2×4 picnic table is now fully assembled and structurally complete!
Step 7: Adding the Outer Bench Support Trim
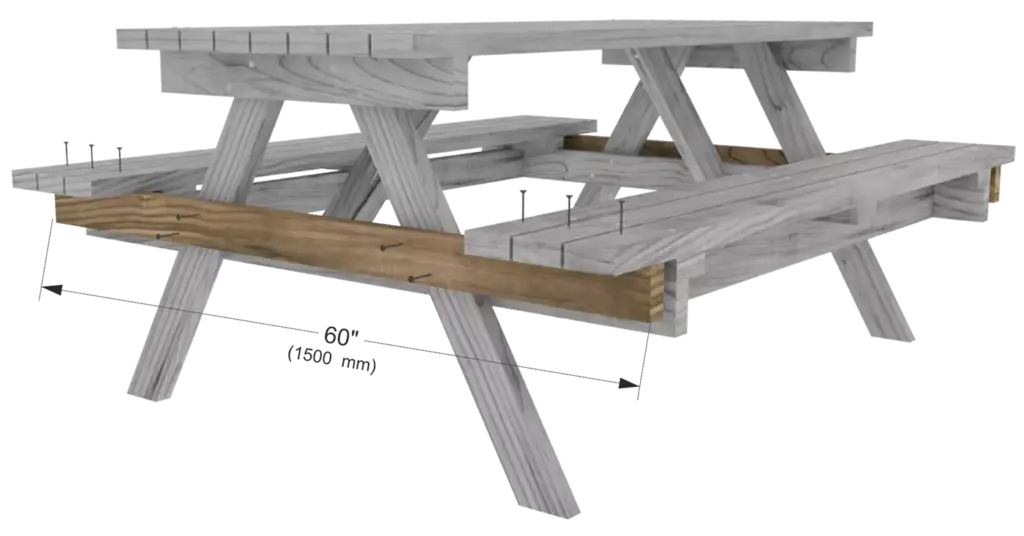
To complete the structural framing and give the benches a clean, professional look, we add the final outer support boards. This element locks the edges of the bench slats to the mitered legs, ensuring the corners remain flush and rock-solid.
Take the remaining two 60″ (1500 mm) boards. Position one board flat against the face of the legs directly underneath the outer edge of the bench seat on each side. Align the board horizontally as shown in the Step 7 diagram. Secure it tightly by driving 2-1/2″ (70 mm) deck screws through the support trim into the legs and up into the bench slats. This final reinforcement guarantees your picnic table can handle maximum weight without a single budge.
Conclusion: Enjoy Your Handmade Backyard Masterpiece
Building a classic 2×4 picnic table is an excellent DIY project that combines functionality, affordability, and durability. By following this guide, adding the crucial center anti-sag supports, and using smart 30-degree angles, you now have an outdoor table that outperforms any store-bought alternative. Sand the surfaces thoroughly, apply a couple of coats of high-quality exterior stain or clear sealer to protect it from the elements, and your backyard is officially ready for the BBQ season!